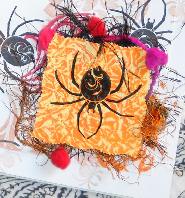
CH--Wax Paper Resist Background Card
Launch gallery slideshow

| Swap Coordinator: | agonysdecay (contact) |
| Swap categories: | Challenges Art |
| Number of people in swap: | 2 |
| Location: | International |
| Type: | Type 3: Package or craft |
| Rating requirement: | 4.90 |
| Last day to signup/drop: | May 19, 2013 |
| Date items must be sent by: | June 3, 2013 |
| Number of swap partners: | 1 |
| Description: | |
|
Using this technique, you will make blank card for your partner to use. This card is senders choice. Here is a link to a tutorial: You will need:
Crumple a piece of wax paper slightly larger than your cardstock. Now open up the wax paper leaving as many wrinkles as possible. Sandwich the wrinkled wax paper in between 2 pieces of GLOSSY card stock with the glossy sides facing each other. Using a warm iron with the no steam setting, you will iron your card stock. The wax paper will SOMEWHAT melt onto your glossy card stock. When it is cool, you will spread ink from your ink pad using a sponge or brayer. Remove excess ink with a paper towel from your cardstock. PLEASE NOTE: I do not have a Brayer. I just smeared my ink pad/pads all over the glossy card stock and then used a paper towel and it worked just fine! I made SEVERAL pieces of these while doing this technique. You probably will too so have different colored ink pads ready! When ironing, make sure to iron all areas. When you are done, you will think nothing happened! LOL. But if you look closely you will see the different pattern and it looks kind of waxy/greasy. I also applied pressure while ironing. I used two 5x7 pieces at a time. You can do your's larger or smaller. CARD SPECIFICS Card size should be NO smaller than 3.5 x 5. For this swap, square or circle or any style of card is okay ;) MAKE sure you use a Rubber Stamped Image somewhere on the outside of the card. While this swap is senders choice, you can always check out your partners profile for ideas. Card MUST be left blank (with the exception of extra stamps on the inside) so your partner can use it! Envelopes can be stamped or non-stamped and can be handmade or store bought. One card to one partner! At first, this swap might seem hard but it isn't and the result is really cool! So, sign up and learn something new!!! If you have any questions, ask here or PM me!! THE PICTURE USED is mine. I have cropped a piece of a card I made to show you how the background will look. The orange and yellow piece UNDER the spider is what it will look like;) | |
Discussion
Leave a Comment
You must be logged in to leave a comment. Click here to log in.
- Info:
- Home
- |
- About
- |
- Forum Rules
- |
- Terms of Use
- |
- Press
- |
- Advertising
- |
- Blog
- |
- Graphics & Stuff
- Help:
- New User Info
- |
- FAQ
- |
- Group Info
- |
- Glossary
- |
- Forums
- |
- |
- Contact Admin

